Sunday, March 24, 2013

 The dyeing to the left is what I did for wild night which is below.
I used slate Blue for the blue on the left and Turquoise, and  Teal and Nautical Blue Pro chem dyes for the handspun yarns, and the rainbow dyed fabric was done with Magenta, Basic Blue and Sun Yellow

Below is my exercise on doing a wild sky for the course.  We were to utilize various colors and textures in our wild sky.  I named mine BIG SKY NIGHT and it will be a 12 x 12" wall hanging when finished.  I utilized all the dyed pieces to the left in this as well as other colors.
I was unable to complete them during the class but when they are done I will post them here.  If this has not locked me out again.
 The photo above was  an exercise in doing squares and I decided that if I was going to do that I would make an table runner and  add some flowers for interest and it is 52 inches long; I will complete it at my leisure as I have scrappy thurms
 This next photo is of my main project which is about 16 x 20" and is being made as a wall hanging.  I call it the OLD MORRIS MILL.  It is a an abandoned old mill that is located in the Tobacco Root mountains about 30-40 miles from home.  The design was taken from a photo I took
Here is some of the dyeing I did for the above hooked project

Wild with Wool


 I just completed a 5 week on line course from Deanne Fitzpatrick called WILD WITH WOOL.  It was very enjoyable and I will show a few shots of various things as a result of that class. Shown are some of the exercises that she had us do
First there were the stars and then second  was a lesson on movement and waves,  That little blue photo is supposed to be a vertical of the ocean or as much as I could make on a  6 x 6" piece.  Sorry it is horizontal but I do not know how to right it in this program. 

Hello again,
I haven't been here because Goggle has made it way difficult and I could not even get into it.  Finally with the help  of my husbands persistence and diligence I am back here at  least for now; there is a lot that is different about the site any more and I will a have to get used to it.    If this works I will be back and it it gets all screwed up again I have not got the patience to tackle it. 
Barb 

Friday, January 18, 2013

It's been awhile

Since I was able to post on this blogsite.  I have been unable to access it and now we wonder if it is again working and if so then I will post more soon but for now this is just a test to see if it works.

Sunday, June 19, 2011

Here are the rugs


Now it time to start a new one


This is my latest creation, also designed by me.  It is called BEARLY  and  shows a mom Grizzley  and her two cubs strolling through the woods.  It was taken from photos of bears in Yellowstone, with the little cub facing you was seen at Hebgen Lake.  I made this for my granddaughter's graduation present.

Here is WHILE REINDEER SLEEP designed by me after I saw internet photos of a moose hitched up to haul logs in the north woods.  I figured if they could haul logs they could haul Santa


This rug is called 3 U's. It was done before Free Ride was started. I hooked the sheep fleece from locks of wool from my sheep so it shows the three colors we were growing at that time. The border was hooked with handspun yarn, and the white flowers were hooked from angora handspun yarns made from our rabbits


This little hooked mat is a design of Pearl McGown, but I did not want to do it in the traditional fine hooking manner so I did it my way.  Most of the wool fabric was hand dyed by me, and the whipping around the edge was done with hand dyed handspun yarn from my sheep.


This rug is Howard's Floral.  It is from an Emma Lou Lais pattern; I did it because I wanted to try a primitive, and wanted to try using a number 8 cut.  This is the result.


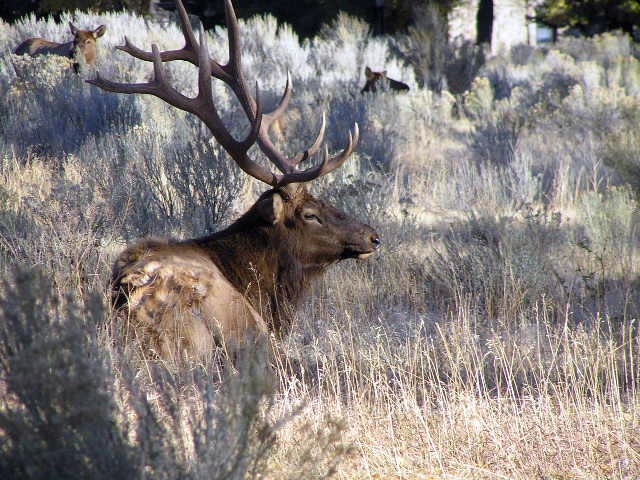
This rug is FREE RIDE.  I took the photo of this elk in Yellowstone Park one year and I had to incorporate him into a rug.  The ravens and the magpie were natural companions of the elk so I used them in the compostion as well...

This shows my Tara rug done for my perky little scotty dog.    It hangs in my studio,  This was  the very first hooked rug I did, about 4-5 years ago now.  The border was hooked with yarn and the interior was hooked with wool fabric.  This rug appeared in Rug Hookers Magazine under beginners rugs.  

ADDING RUG HOOKING AND PUNCH NEEDLE DESIGNS


I am going to add some of my rug hooking designs that I have completed so far, and some of my punch needle ones that are either completed or in progress so that folks who are interested can go to my secondary blog listed on the right as the Dragons lair to select and purchase those designs or just look at them if they like.


The above punch needle shows the day time version of While Reindeer Sleep in progress, still in the frame I work them on.

 This is a watercolor of a night time version of While Reindeer sleep. See my hooked rugs to see it done up on hooking
 The Ryeland sheep punch needle shown here gives you one idea of how it can be worked up.
The Pumpkin patch design worked in punch needle and framed up.

Wednesday, October 14, 2009

German Angora trivia stuff

I am enjoying the development of my newest litter. They are the first litter that I've had that is totally raised by the mother and she is doing a great job. This is her second litter, but the first one was a hybrid litter, and there were 3 of them. I suppose that was a learning litter! But she had sufficient instinct to use the nest box, and raised them all without any losses, and is likely raising this litter without any losses. One of the trickiest times for baby rabbits, I've found, is when they start eating pellets, and gradually weaning from mother's milk. In about 2 weeks I will do my first evaluation on the litter and sex them. They are a product of brother sister breeding so inbred this one generation, which would not be my first choice but I wanted to emphais the mother's line instead of the father's line so I chose the brother over the father for a stud. I really need to get an outside bloodline but so far it is not working out. I've had another doe Abby, who is the result of a brother sister breeding and she has been an excellent rabbit...great mothering ability, fertility, and high producing wool and the daughters I've kept from her have been as well....plus she is so milky that she is my main foster mother.
The mother of the new litter is just 13 months old so I consider she is doing an excellent job. This is a far cry from all my previous purebred German does, who either did not do the job right, in the birthing, in the mothering, in the milkiness, or got sick themselves and died before they could reproduce. I will definetly keep a doe from this litter. Next time I will talk about angora fiber. ( I hope).

Sunday, September 20, 2009

The latest in German Angora rabbits


Here is Little Joe at 3 months old already. His parents are Absarokee and Bitterrootret. He shows great promise of nice black silky soft wool. He is ready for his first haircut.
This sweet little baby is the same Little Joe but shown at 6 weeks old. He is my latest German Angora hybrid buck, and hs is a lovely black. He too is over 98% German Angora, and as you can see by his blue eye he carries the chinchilla gene as well as the black gene.

To the right is Snowcrest with a big black spot of tattoo ink in her ear at 6 weeks old. look how much she grew between 6 weeks and 3 months.


The photo to the left is Snowcrest at just a little over 3 months old and she has already had her first shearing to remove baby wool. It's normally discarded as it's so soft, but it can be handspun to make a delicate and soft yarn that made into knit garments that will get little use, such as a neck scarf. She is a purebred German Angora from Winter's Dream and Snowstorm.

This is Jack, at 3 months, he is over 98% German Angora and so is called a German Hybrid. It's amazing how fast they grow.


Here is Jack at only 6 weeks old. The number is his ear tattoo


This is a newborn shown at day 7


Here is a photo of the purebred German Angora litter of bunnies born this month and they are about 5 days old here. They are born nearly hairless at birth and you can see that they are already getting furred.


This is a pic of Winter Storms as he was as a youngster. I need to get some adult pictures. He is the sire of the upcoming baby littler that I am going to show.


This photo shows Snowstorm; she is the mother of SOW.

Angora photo updates


Here are some of the most recent photos I've taken of the Angora population here. The top photo shows Winter Dreams as he was at 5 months of age. He is my senior purebred buck here and he will be five years old next year.
The middle photo is Snows of Winter (SOW) as she was as a baby, and then as she is now as an adult. She is a shade over 1 year old and has had 11 babies. Amazing rabbit

Saturday, September 19, 2009

How time flies

It's been ages it seems since I have had time to post to this blog. Maybe I can start catching up. We've had a cooler, later, and somewhat wetter summer than normal and I have relished it. However, now in September we seem to be experiencing summer. Much hotter and very dry. the poor plants wither so bad I can hardly keep up with their watering. The garden has been growing but slowly and I just hope that the frost stays away long enough to harvest the tomatoes. The poultry have been having a good year, raising chicks, and ducklings and gunieas. Our guineas flock increase this year by 6 new ones, and they are all running wild. They do drive me slightly nuttier because I have to think of ways to keep them from eating newly sprouted greens in the garden, and they chatter continueally.............But the grasshoppers have been way down this year, and tick season was short so I credit them with that. I wish they would catch hornets! They do catch and eat mice though! Sheep wise, that status quo is about the same. We still have 4 ewes, and 1 ram. However, we are likely to add another ewe lamb and we did replace our ram. This new one is 50% Icelandic, and the rest if a border Leicester/cormo complicated cross. His wool is white, lusterous and has a nice handle.
The rabbity has been thriving and we had out first large litter of purebred German Angoras and and all raised by the mother which makes me very proud of her. We've had other purebred German Angoras before, but none that were from large litters, or that were successfully raised by their mother. I gave her the unglamorous of SOW hoping she would raise her babies as easily as a pig does and she seems to. :)
Time to go now. Hopefully pictures next time
Barbara

Thursday, November 20, 2008

CLOSE UP OF MORE SKIEINS FOR PN

THIS SHOWS THE RAINBOW DYEING ON PN SKEINS. This was all rainbow dyeing as talked about below

CLOSE UP OF SKEINS FOR PN


WEEKEND DYEING


This picture above of the sock blank after it has been of rainbow dyed. This will hopefully make
an interesting pair of socks. This was done with Pro-Chem's wash fast acid dyes using the colors
of boysenberry ( darkest value) Mulberry medium value) and buttercream ( lightest value). It
is drying on a sweater rack.

The photo top right is the whole of 5 batches I did for punch needle embroidery. The burgunday colored ones are two batches of rainbow dyed ones using the same colors as in the sock blank on the left. There are 3 seperate batches of 3 skeins each in solids also for PN.
The colors used were Prochem Avocado and Spiced Pumpkin but neither at full strength. The blue is Kiton Acid dye turquoise, again not full strength. some of these were heat set in the microwave, and some heat set in the oven at 350 degrees.

Wednesday, November 19, 2008

The Latest in DYEING

I've started building a palette of colors in yarn for my needle punching projects. I started with a skein of merino 2 ply yarn. I broke it up into useable skeins that average 25 yards each. I've since tried it in the needle punching and it works great with enough "bloom" to puff out on the right side. I need both solid colors, and varigated. I used squirt bottles and sponge brush to apply the dye to the skeins for both the solids, and the varigated. I heat set the dyes by: some in the micro wave, and some in the oven, speed. I used Pro-chem Wash Fast Acid dyes, and one Kiton Acid Dye . Here are the results.

Monday, August 18, 2008

ART...........scratch board


The brown eyed Susan's picture with the Painted Lady is # 3 and the American Copper on a daisy is #4 and the Monarch on a thistle is #5 and all are done on 5 x7" boards.

The giraffes drawing is a sketch for a future one, I plan to do in larger size. Next I am working on the horse to try that in a 5 x 7. I love this size because is you make mistakes or have flaws in some form, you haven't ruined as much material.
fun, fun, fun.


Finally here is step 2...the actual scratching part Things don't always go like I planned. this is the completed picture and it shows a Swallowtail butterfly on a tiger Lilly. This is a 5 x7" panel and is not step two but the final result. Somehow the second step got left out and I will try to add it now.


This is the first step in the process...adding the chalk lines.
Below is my first piece and it on a 5" x 7" board. The butterfly is supposed to be a Swallowtail on a thistle bloom.


I discovered recently a new technique of art for me. It was shown to my by my daughter Kathy who is proficient in the medium. It's a simple as drawing and goes quickly which I consider a plus. I will show what I have done already, and the progress of one of those so you can see the process. You start with an original drawing on paper, minus the details, so it is essentially an outline; then you chalk the back for transferring to the scratch board. Once it is done you lightly scratch over the chalk lines using a stylus or pen like scratcher. Then you remove the chalk lines with a soft cloth and begin scratching in the details. Afterward you can begin painting or inking in the color if you wish to do it in color or leave it in dramatic black and white. Very cool process.


Saturday, July 26, 2008

SHEEP


Gosh...a long stretch of time has gone by since I entered anything into this blog. I will never catch up so won't even try.

In early July we picked up a new lamb from a Shetland breeder not to far from us, and she is a cutie. We named her CAMILLA. That is supposed to be German for Chamomile which is the name I wanted for her. We have loosely followed a botanical theme in sheep names. She's white because she is meant to be a replacement for Fleur who we were culling.

However, Fleur is still here, as she pulled a sly one at loading time and got away from us. We'll try taking her in when we load fall lambs now. She is isolated and feed until I think it safe to release her. That way she doesn't get knocked away from the feed, and can have some goodies that the others can't have. She is also somewhat more catchable ( but not very) for vaccinations, and physically checking over. It also allows her to get acquainted with the flock without getting harmed. Here's a few photos.

Friday, March 14, 2008

Skirting and Picking

These photos show various steps in the skirting and picking process. The two photos here, on the left, and below on the right are both from Priscilla. ( You can scroll down into the blog to learn more about her, and see her with her full fleece intact.)
The photo on the left is the skin side or cut side exposed. The photo below shows the mostly the top side, so you will see the tipped ends of the staples and wel and the gray undercoat.


The photo to the right shows, a small sectioned off portion of the whole fleece that I am working with. If a fleece is not intended for competition, but is to be used primarily as a hand spinning fleece this is what I do to ease the picking part.
The small section is moved away from the main body of the fleece and then I tease the fibers apart, and flip them over several times, sometimes shaking this portion in the wind so that the smaller parts of debri are removed and as much vegetable matter ( or VM) as possbile is removed.


The next photo shows the skin side of Irish Frost's fleece prior to the small sectioned off piece. You can see also some smaller pieces, that are called second cuts, and all of those as you can reasonably find are removed as well.
Once the smaller section is picked over it is placed back in the plastic bag, and another small areas is removed and worked on until the whole fleece is done. At this point I then weigh each fleece again, and that is my yeild weight...both the raw weight and the yeild weight are recoreded. I also decide that that point what I am going to do with a fleece. Sell it, or use it myself. I usually have more than enough for myself which is why my stash is so huge, but I normally offer the best ones for sale, because I can deal the fleeces with too much VM later in the process, but you can't offer it to the public.
This year, out of the fleeces I have I am keeping Nightshades, Cinnamon, and her black wether because there is just too much VM. The rest are cleaner fleeces. Nightshades fleece has a wonderful soft handle and is a solid jet black and a non fading black which is very rare but it is just too contaminated. The black wether is the same, but he has just started the greying process. And Cinnamon is too small a fleece weighing only about 1 1/2 lbs, and there are those annoying tips, from last years fleece which occur because Shetland "roo" or molt after shearing.